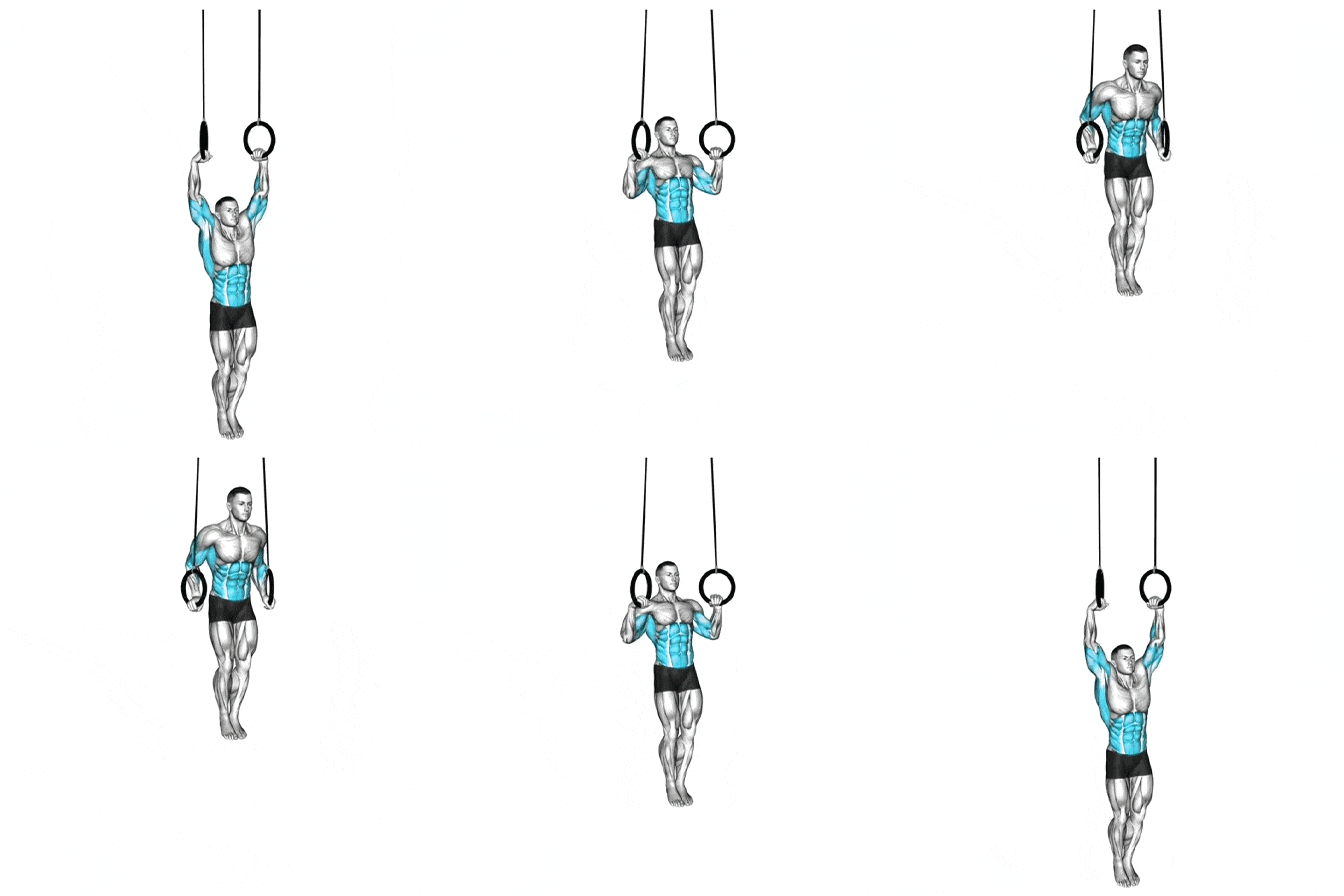
Mastering the Ring Muscle-Up
Instruction
1. Warm-Up
Before attempting ring muscle-ups, it's crucial to warm up your shoulders, wrists, and core. Focus on dynamic stretches, shoulder dislocations, and basic pull-ups to prepare your body for the movement.
2. Grip and Setup
- Grip: Start by gripping the rings with your palms facing inwards (neutral grip) and your thumbs wrapped around the rings. Your hands should be slightly outside shoulder-width.
- Ring Height: The rings should be set at a height where you can hang comfortably with your feet off the ground but still have enough room to pull yourself up. A common setup is to adjust them at about shoulder height or slightly higher.
3. The Kip (Swing)
- Start in a Dead Hang: Begin by hanging from the rings with your arms fully extended. Engage your lats and core to prevent excessive swinging.
- Kipping Motion: Initiate the kip by swinging your legs forward and then quickly pulling them back, creating a reverse arc. This motion should generate momentum.
- Chest to Rings: As you swing backward, focus on driving your chest forward toward the rings. The goal is to use the kip to propel your chest upward and forward into the rings.
4. Pulling Phase
- Engage Lats: As you begin to pull yourself upward, think of pulling the rings down toward your body rather than just lifting your chin above the rings. Your elbows should be pointed down and out to the sides.
- Chest to the Rings: As you pull, allow your chest to rise toward the rings. Your head should be slightly forward, and your torso should begin to move into a more upright position as you approach the top of the movement.
5. Transition
- From Pull to Push: As you near the top of the movement, your chest should be over the rings, and your arms should be bent at a 90-degree angle or more. The key to a successful muscle-up is smoothly transitioning from the pulling phase to the pushing phase.
- Dip Transition: Quickly transition your chest over the rings and prepare to perform the dip. This is a critical point where many athletes struggle. The quicker and more fluid you can transition, the easier the muscle-up will be.
6. The Dip
- Press Out: Once your chest is over the rings, use your arms and shoulders to press yourself upward into a full dip position. Your arms should lock out fully at the top, and you should be above the rings with your elbows extended.
- Stabilize: At the top of the dip, keep your body tight, engage your core, and focus on a smooth control of the movement as you prepare to descend.
7. The Descent
- Controlled Lowering: Lower yourself back down by bending your arms slowly, maintaining control of the rings as you descend. Aim to resist gravity to avoid a crash landing and prepare for your next rep.
Tips
- Be Patient: Ring muscle-ups require a combination of strength, timing, and technique, so be patient as you work toward mastering the movement.
- Build Shoulder and Core Stability: Ring muscle-ups demand strong shoulders and a stable core. Incorporate accessory exercises like shoulder presses, planks, and hollow body holds to develop these areas.
- Focus on Smooth Transitions: The transition phase from the pull to the dip is where many athletes fail. Work on making this phase fluid and efficient.


